Advanced Animation - Exercises
1.
Lectures
2.
Exercises
Exercise 1: Bouncing Ball Animation
Exercise 2: Pendulum Animation
Exercise 3: Good Poses
3.
Feedbacks
4.
Reflection
LECTURES
Week 1 / 24.9.2024
Miro notes: https://miro.com/app/board/uXjVLb9P1FA=/?share_link_id=357865706027
In week 1, Mr Kamal brief us on the module, advanced animation. For this module, we will learn about 3D animation, we will focus on animation but not modeling.

Module Briefing
Then, we are briefed on what we will learn in week 2 and the exercises. For exercise 1, we are going to do bouncing ball for 4 different weights, including football (basic), ping pong (light), balloon (super light) and bowling ball (heavy). In the following week, we will focus on flexibility, for exercises, we should apply squash and stretch on football and also animating pendulum. Next, we will learn about clarity - poses (silhouette, contra posto, weight and balance, avoid twinning and parallel), it is more on character rigging.
- FK (Forward Kinematics) - rotation
- IK (Inverse Kinematics) - straight line (no arcs)
Then, we will proceed to walk cycle. There are 2 parts for this project, including normal walk and attitude walk. In week 6, we will learn about jump animation: 1. Timing (Variety of Timing) 2. Big Anticipation and Big Follow Through (Clarity of Action) 3. Drag and Overlapping (Flexibility) 4. Hold (Moving Hold - anticipation and follow through).

Week 5 - Walk Cycle
In week 7, we will start to prepare for final project, we will start with action animation. Planning > Video references > Key, Extreme, Breakdown (Blocking).
- Stepped Key (Maya); Constant (Blender) - No interpolation (Timing + Good Poses)
Week 7 to week 9: Planning > Blocking > Polishing. (Action reference + Camera Cut)
Performance Animator - Dialogue Shot (story, acting, voice over - timing);
Lip Sync (gesture)
Appearance - Lighting, Rendering, Visual
Week 2 / 1.10.2024
In week 2, we will be learning about timing, spacing and arcs. In 2D animation, we need to draw each frame to create sequential images OR (modern technique) animate the drawing using rigging method (create an image library - a hierarchy, set pirot point, animate like a puppet). In 3D animation, we need to pose the rigged object or character (like a puppet control).
*Treat the pose like drawing
Animation Fluidity (Slides Notes)
Miro Notes: https://miro.com/app/board/uXjVLY7xEpM=/
1. Timing - Duration [1 sec - 24 fps]
2. Spacing - Slow out
[acceleration]; Slow in [deceleration]; Constant speed
3. Arcs -
3D viewport display

Bouncing Ball Animation (Miro Notes)
Bouncing Ball Animation Tutorial
We downloaded the blender file for ball animation Mr Kamal posted.

Blender - Ball
Deform:
Add mesh [Cylinder] > Add horizontal subdivision >
[Object]-[Apply]-[All Transform] > Add modifier
[Add]-[Armature]-[Single
Bone] > Edit mode > Pose mode
Object mode > Ctrl +
P
Weight paint > Data > Bone
Add bone chain: Edit mode > Select Joint > Press E to exclude
Master Control (Below the ball, with arrows)
[i] > location > move to 25th keyframe > locate ball > [i] > location

Object Data Properties > Motion Path > Calculate
Interpolation
Mode > Linear

Motion Path
Locate ball at 49th keyframe > Update path > Go back to 25th
Right
click > Handle Type > Free
Straighten the path > Update path
> Locate ball at 37th frame > Update path > Adjust arc > Update
path

Arcs

Bouncing Ball Arcs
Yellow > [i]-[rotation]-0 > Last frame > Y axis - -360/-720 > [i]-[rotation]
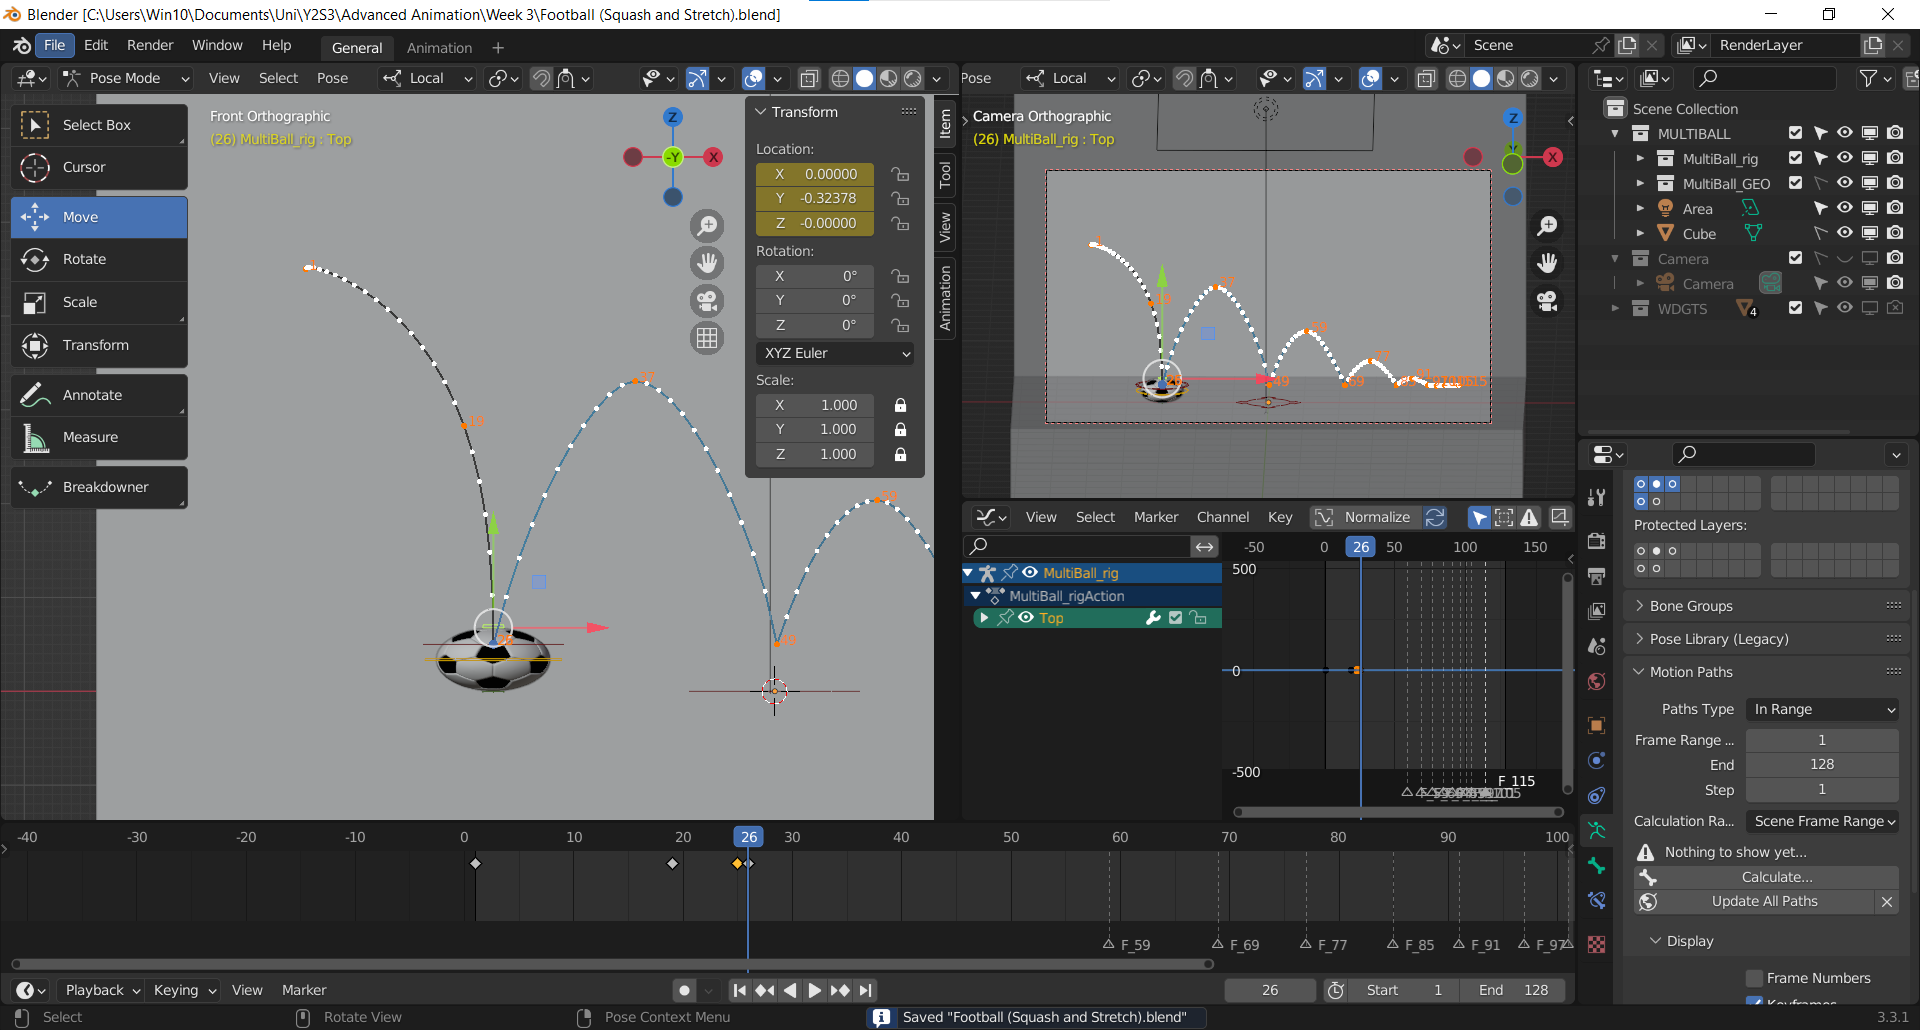
Week 3 / 8.10.2024For the third week, we learned about flexibility, squash and stretch for lecture. And then proceed to tutorial for squash and stretch.

Flexibility (Miro Notes)
Slide Notes
Squash and Stretch
1st frame: Select the red circle, rotate according to the arc > [i] >
rotation
Contact frame: Set rotation to 0
Frame 19 (In between):
Rotate circle according to the arc > [i] > rotation + Select the green
circle (top) > Stretch > [i] > location
Contact frame:
Rotate according to arc > [i] > rotation
Copy contact frame and
paste to the next frame > set rotation to 0 > Squash > [i] >
location

Squash and Stretch - 1st frame

Squash and Stretch - In between

Squash and Stretch - Contact frame (Stretch)
Squash and Stretch - Contact frame (Squash)
In the next frame, set rotation to 0
Select the green circle > set
to 0 > Stretch > [i] > location
Select the red circle >
rotate according to arc > [i] > rotation
Squash and Stretch - Attempt 1
For me, I think it looks ok except for the timing. So, I tried to adjust the timing, let the stretch at the contact frame holds longer, same goes to the squash frame.
In week 4, we started our next exercise, which is pendulum animation. We followed the demonstration from Mr Kamal for the tutorial class.
1. Understand the controls
- Master / Root (Move, rotation, scale)
- Tail Head (Rotation)
- Tail Mid (Rotation)
- Tail End (Rotation)
2. Disable copy rotation
Only tail head can rotate because tail mid and tail end are inherit from tail head.
- Select tail mid / tail end
- Bone constraint
- Off "Copy Rotation"
- Alt + R to reset

Copy Rotation
*Drag, follow trough, overlapping
[Master / Root] Location:
1-12: Hold
13-25: [i] > Location
*Change to individual origin

Individual Origin
Rotation:
1-12: Hold
13-18: Start moving - [i] > Rotation (left) at frame
18
19-22: Drag
23-28: [i] > Rotation (right) at frame
28
29-36: Copy frame 22 and paste at frame 36
37-44:
Copy frame 28 and paste at frame 44; Adjust the rotation - lower than the
previous (frame 28)
*Add breakdown in between (Frame 40) Tail head - leading (rotate
slightly R); tail mid and end - (rotate L)
45-50: Copy frame 36 and paste at frame 50; Adjust the rotation -
lower than the previous (frame 36)
*Add breakdown in between (Frame 47) Tail head - leading (rotate slightly
L); tail mid and end - (rotate R)
51-56: " *Add breakdown in between
57-60: "
61-64:
"
65-66: "
67-68: "
70: Alt + R (Stops)
.png)
Tails - Keyframe

Breakdown
When doing rigging, there are [CloudRig > Layers]
- Inverse Kinematic [IK]
- Whole joint is moving -
Forward Kinematic [FK]
- Hinge joint
- Rotate individual joint
FK/IK Switch:

IK/FK
Fingers - similar to pendulum (switch to individual origin)
To change animation:
Select hand control
Go to Animation > Change pose
Go to
Pose
Copy Pose > Paste Pose Flipped
INSTRUCTION
Exercise 1: Bouncing Ball Animation
In the first exercise, we need to find references and observe the difference of each ball's physical property (football, ping pong and bowling) and its weight. Then, we should analyse how does it affect:
- The timing and travel distance of each bounce (Contact pose to Contact pose)
- The overall timing that determines the number of bounces
- The height of each Up pose when it bounces
- Football - https://www.youtube.com/watch?v=01cm7H1QoJg
- Ping Pong - https://www.youtube.com/watch?v=gTsx5eW2eLU
- Bowling ball - https://www.youtube.com/watch?v=DTz_5quG_ig
- Beach ball - https://www.youtube.com/watch?v=s74P1ejubEA
A. Football (Normal Weight)

Motion Path - First Arc

Football (Normal Weight) - Arcs
Final Bouncing Football Animation
B) Ping Pong Ball (Light)
The next one is ping pong ball, which is lighter than football. Therefore, the speed of the ball is quicker. I created the first arc (half) from frame 1 to frame 6 and adjust the path. For the second arc, I located the ball from frame 6 (contact), frame 16 (up) to frame 26 (contact). As the speed of the ball decreases, I decreased the number of frames.

Ping Pong Ball (Light) - Arcs
As the ball is light and small, so it bounces more compared to heavier ball. Lastly, I added the base and light and render it to video.
Final Bouncing Ping Pong Ball Animation
(Revised) Final Bouncing Ping Pong Ball Animation
C) Bowling Ball (Heavy)
Next, we have to do bowling ball, which is heavier than normal weight. I watched the reference video and found out that the ball only bounces lower compared to the others. Therefore, for the first arc (half), I used 10 frames, same with the second arc, 10 frames for contact to up and 10 frames for up to contact. The height of "up" in the second frame decrease significantly since it's heavy. And from the 3rd arc onwards, I started to decrease the numbers of frames and also the height. As it only bounce for 4 times in the video, I also did not make too many arcs.

Bowling Ball (Heavy) - Arcs
Similar to the previous one, I added base, colour and adjusted the lighting and finally render the final result.
Final Bouncing Bowling Ball Animation
(Revised) Final Bouncing Bowling Ball Animation
D) Beach Ball (Super Light)
For beach ball, I found that I'm not that familiar to it compared to the others. So, I relied on the reference to animate the bouncing beach ball. As it is super light, it moves slowest among the balls. I used 30 frames for the first arc (half), and for the second arc, I used 16 frames for both contact to up and also up to contact. The distance between contact and contact is longer also compared to ping pong ball. There are total 5 arcs for a bouncing beach ball.

Beach Ball (Super Light) - Arcs
Same with the others, I added the base and light before rendering the animation.
Final Bouncing Beach Ball Animation
(Revised) Final Bouncing Beach Ball Animation
E) Squash and Stretch
In the tutorial class of week 3, we learned about squash and stretch for the bouncing ball. I adjusted the rotation for a few times because it looks sloppy. I tried to make the flexibility looks as natural as possible. However, I think the final outcome still can be improved.
After feedbacks in week 4, I applied linear in interpolation mode to make sure the ball is in the right mode. I adjusted the keyframes to fix it and came out with the final revised squash and stretch animation.
(Revised) Final Squash and Stretch Animation
Exercise 2: Pendulum Animation
In the second exercise, we have to animate the pendulum main object moving from left to right on the screen and swing to show drags, overlapping and follow through.

Keyframes
The process is recorded at [Lecture - Week 4]. I used the pendulum animation we did in tutorial to refine it. I added breakdown until frame 64 to make the movement of the pendulum smoother. Then, I added base and lighting to render it.
Final Pendulum Animation
Final Pendulum Animation
Exercise 3: Good Poses
In this exercise, we have to find image/video reference for action poses that show the 4 emotions, including happy, sad, angry and scared. We should observe the reference and spot the key or storytelling pose and its dynamic. Then, we should draw from our study of the pose to show line of action, silhouette, weight and balance / contrapposto and avoid parallel and twinning. After studying, we have to pose the character’ body and facial expression to depict the action and emotion.
References

Reference - Happy
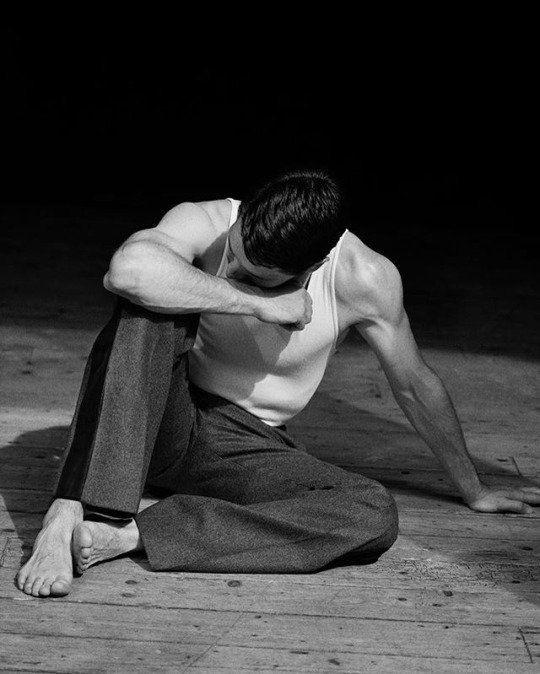
Reference - Sad

Reference - Angry

Reference - Scared
.jpg)
Line of Action & Silhouette - Happy and Sad
.jpg)
Line of Action & Silhouette - Angry and Scared
Blender
Happy

Left Arm

Both Arms
Then, I bend his legs using the hip control, but keep IK/FK switch for right leg as 0.000. I moved his right leg up and move the lead control of the knee so that it follows the direction where his right foot goes. After that, I moved the lead control of his left leg to face out a bit, and then use rotation on his left foot to make it looks tip-toeing when jumping.

Legs
Then I rotate his body slightly to the right using IK. I also choose the expression from animation section and adjust his eyes to make the happy expression.

Expression

Final Pose - Happy
Sad
For sad, the pose is supposed to be sitting. Therefore, I first moved his hip and spine control back together with the hands and shoulder control.

Sitting Pose
Then, I adjusted his feet and the knee controls to bend his legs to the side.

Legs
I bend his right arm and moved it towards his right leg as the hand supposed to rest on his leg. Simultaneously, I bent his body and head to make his head nearer to his arm since the arm of this action should be covering his face. I changed the hand into a fist. For the other hand, I moved down using the hand control and adjusted the elbow control.

Right Arm

Final Pose - Sad
Angry
Continue with the angry emotion, I started with posing the legs of the character. I move out both of his legs using the feet control and rotate them.

Legs

Right Arm

Left Hand
Then, I bent his body down and rotate his body to face the front a bit. I also moved his shoulders according to his arm movements. At first, the body was stretched too much, so later I amend it.

Body
Then, I apply angry eyes, eyebrows and mouth for him.

Scared

Legs
After finishing the legs, I bent his body to the side and rotate it facing the opposite, especially the shoulder part. Then, I started to work on his arms and hands. I moved his left hand in towards his body and his right arm upwards. Then, I rotate his hands to face the side.

Arms

Body
Lastly, I changed his expressions to a scared face. To make it more exaggerate, I moved the jaws lower.

Expressions

Final Pose
Final Exercise 3: Good Poses

Final Good Poses - Happy

Final Good Poses - Sad


Final Good Poses - Scared
Line of Action - Silhouette - Final Pose
Revised Exercise 3: Good Poses
%20Sad.png)
Revised Good Poses - Sad
%20Angry.png)
Revised Good Poses - Angry
FEEDBACKS
Week 3 / Exercise 1
Ping Pong Ball: Can make it faster, bounce looks ok
Bowling Ball: Can
make it drops more impactful
Beach Ball: Can make it bounce slower
Week 4 / Exercise 1 (Squash and Stretch)
Contact pose can hold longer (4 frames). Check the mode, make sure it's interpolation mode for transition between stretch and squash. Maybe the ear is a little bit long.
Week 5 / Exercise 2
Very good!
Week 6 / Exercise 3
Can add structure (where the hip / body should rotate) for study. Better to follow the camera angle of the reference to compare them.
Happy: Be careful on the twisting of the body, can make right leg more natural - move closer to the body, the hip of the reference is facing 1/3 to the left, overall is ok, just minor amendments needed

Happy - Feedbacks
Sad: Not quite there yet, the weight of the entire body should be leaning towards his left arm, need to bend his body to the left. Make sure all the weight is transferred to the left arm

Sad - Feedbacks
Angry: Left leg can be more natural, the body twisting is not matching with the hip twisting. A bit cartoonist for this one.

Angry - Feedbacks
Scared: Hip is good, left leg can move to the side more. Body twisting is good, can lift more if want. Hand is ok, will be more interesting if the fingers are closer together, right arm can lower a bit. Make sure the fingers don't block the face. Can play around with the line of action more, the rest is ok.

Scared - Feedbacks
REFLECTION
For the first exercise, bouncing ball exercise, it was a new experience for me. Although for the theory part is the same with what we learned in Animation Fundamentals, the practical part, it was a whole new world as we are doing 3D animation, which is totally different from 2D animation, where we draw the animation frame by frame. At first, I was a little bit lost when we did the exercise in class. Luckily, after completing the tutorial, and understand how to animate in Blender, I was able to continue with the rest exercises. From this exercise, I observed how different weights of different balls affect the timing, spacing and arcs. After all the confusions in the beginning of animating using Blender, I found that the bouncing ball exercise is quite fun. For squash and stretch, at first, I think it's ok. However, at the last few arcs, I faced difficulties since I felt like the flexibility and the rotation looks unnatural. So I spent quite a lot of time to improve it. I'm not sure about the timing too, so I need to figure it out. For the third exercise, at first, I was quite confused about the IK and FK. But after starting to work on the poses, I slowly got the its concept. It's like if we couldn't pose it using IK, then we can switch to FK. Sometimes, when I need to rotate the body parts, I can't adjust it correctly. So, I used quite some time to figure it out. At last, I was able to finish all the 4 poses with different emotions, and I am satisfied with the results.


Comments
Post a Comment