Advanced Typography - Task 1: Exercises
30.8.2023 - 13.9.2023 / Week 1 - Week 3
Chan Wan Qing / 0350928 / BA of
Design (HONS) in Creative Media
Typography
Task 1 (Exercises)
INDEX:
1.
Lectures
2.
Task 1 / Exercises
Exercise 1 - Typographic Systems
Exercise 2 - Type & Play
3.
Feedbacks
4.
Reflection
5.
Further Readings
LECTURES
AdTypo_1_Typographic Systems
Typographic systems provide a sense of purpose that focuses and directs the decision-making. Additional criteria like hierarchy, order of reading, legibility, and contrast are also to be considered.
Shape grammar: A set of set rules that apply in a step-by-step way to generate a set, or language, of designs.
8 major variations of typographic systems:
- Axial System - All elements are organised to the left or right of a single axis


- Radial System - All elements are extended from a focal point

- Dilatational System - All elements expand from a central point in a circular fashion

- Random System - Elements appeared to have no specific pattern or relationship

- Grid System - A system of vertical and horizontal divisions

- Transitional System - An informal system of layered banding
- Modular System - A series of non-objective elements that are constructed as standardised units


- Bilateral System - All text is arranged symmetrically on a single axis

AdTypo_2_Typographic Composition
Typographic composition is the arrangement of textual information on a given space. Dominant compositions in design include emphasis, isolation, repetition, symmetry and asymmetry, alignment, perspective, rhythm, contrast.

- The Rule of Thirds - A space can be divided into 3 rows & 3 columns. The intersecting lines are used as a guide to place the points of interest, within the given space.

The grid system continues to remain popular due to its versatility and modular nature. Our readability prefers ordered and organised compositions over those that are chaotic. In the modernist era of Typography, younger designers challenged the ordered approach and explored chaos, randomness, and asymmetry in typographic systems.


- Environmental Grid - Based on the exploration of an existing structure or numerous structures combined. An extraction of crucial lines both curved and straight is formed.

- Form and Movement - Based on the exploration of an existing Grid Systems. The placement of a form on a page, over many pages creates movement.

AdTypo_3_Context and Creativity
Studying handwriting is important because the first mechanically produced letterforms were designed to directly imitate handwriting. Handwriting would become the basis or standard for form, spacing and conventions mechanical type would try and mimic.
Development of Writing Systems-
Cuneiform (c. 3000 B.C.E)
- the earliest system of actual writing
- written from left to right
- evolved from pictograms

-
Hieroglyphics (2613 -2160 B.C.E)
- fused with the art of relieved carving
- as ideograms, represent the things they actually depict
- as determinatives to show that the signs preceding are meant as phonograms and to indicate the general idea of the word
- as phonograms to represent sounds that "spell out" individual words

-
Early Greek (Phoenician letters) (5th C. B.C.E.)
- drawn freehand, not constructed with compasses and rules, no serifs
- in time the strokes of these letters grew thicker, the aperture lessened, and serifs appeared
-
Roman Uncials
- roman letters became more rounded, the curved form allowed for fewer strokes and could be written faster
-
English Half Uncials (8th C.)
- the uncial evolved into a more slanted and condensed form
-
Carolingian Minuscule
- capitals at the start of a sentence, spaces between words and punctuation
- this style became the pattern for the Humanistic writing of the fifteenth century
- the basis of our lower-case roman type
-
Black Letter (12-15 C. CE)
- characterised by tight spacing and condensed lettering
- evenly spaced verticals dominated the letterform
- condensing line spacing and letter spacing reduced the amount of costly materials in book production
-
The Italian Renaissance
- newly rediscovered letterforms Antica
- the renaissance analysis of form that was being applied to art and architecture was directed toward letterform, resulting in a more perfect or rationalised letter


Fig.1.19 The Italian Renaissance
-
Movable Type (11 C. – 14 C.)
- introduced in 1000-1100 CE
- this innovation was pioneered in China but achieved in Korea
- the earliest known printed book (A.D 868) is Diamond Sutra

-
Indus Valley Civilization (IVC) script (3500-2000 BCE)
- the oldest writing found in the ‘Indian’
- is as yet undeciphered and seems to have been somewhat logo-syllabic in nature

Fig.1.21 Indus Valley Civilization (IVC) Script -
Brahmi script (450–350 BCE)
- the earliest writing system developed in India after the Indus script
- all modern Indian scripts and several hundred scripts found in Southeast and East Asia are derived from Brahmi


-
Pallava (Pallawa in Malay)
- a South Indian script originally used for writing Sanskrit and Tamil
-
Pra-nagari
- an early form of the Nagari script, was used in India for writing Sanskrit
-
Kawi
- Indonesia's most important historical script is based on Nagari, but indigenous to Java
- used for contacting other kingdoms
- became the basis of other scripts in both Indonesia and the Philippines
-
Incung
- the original writing system from Kerinci, comes from a South Sumatran grouping of scripts known as Rencong
Other scripts that are assimilated from Indonesian communities into Peninsula Malay Communities: Rajang script, Batak script, Bugis script (Lontara), and Javanese script.

Fig.1.23 Writing Systems in Southeast Asia
-
Jawi
- the Arabic-based alphabet that was introduced along with Islam
Why design another typeface? [suggested by Xavier Dupré (2007)]
- type design carries a social responsibility so one must continue to improve its legibility
- type design is a form of artistic expression
Frutiger
- a sans serif typeface designed by the Swiss type designer Adrian Frutiger in 1968
- tested with unfocused letters to see which letterforms could still be identified in poor light conditions or when the reader was moving quickly past the sign

Verdana
- a specifically designed typeface for the screen by Matthew Carter, commissioned by Microsoft
- hinting is essential to enhance the readability on the screen


Bell Centennial
- commissioned by AT&T which wanted a new typeface for use in their telephone directories
- ink traps are designed in the typeface to prevent ink spread when printing on low-quality paper at high speeds


Johnston Sans (previously known as Underground typeface)
- created by Edward Johnston for the commission of the posters and signage of London's Underground Railway
- combined classical Roman proportions with humanist warmth
1. Research
- traditional/digital
- professional softwares: FontLab and Glyphs App
- some designers
also use Adobe Illustrator then only the specialised font apps - frowned
upon by the purist
- to refine and correct the aspects of the typeface
- prototyping
is a part of it and it leads to important feedback
- deploying a typeface doesn't mark the end of revision as unforeseen issues may surface after post-prototype and testing phases
Using grids (with circular forms) can facilitate the construction of letterforms and is a possible method to build/create/design your letterform.

Construction and considerations
Depending on their form and construction, the 26 characters of the alphabet can be arranged into groups, whereby a distinction is made between a group for the capitals and a group for lowercase letters.
Different forms and constructions must be taken into account when designing a new type. An important visual correction is the extrusion of curved (and protruding) forms past the baseline and cap line (overshoot). This also applies to vertical alignment between curved and straight forms.

Fitting the type: A visual correction is also needed for the distance between letters. The letters must be altered to a uniform visual white space - the white space between the letters should appear the same.
Ink traps were generally used when printing on cheap absorbent paper and when printing is fast and not very precise. Excess ink gathers at the corners, but with ink traps the corners remain visible.

Visual correction
- the extrusion of curved (and protruding) forms past the baseline and cap line (overshoot)- the distance between letters should appear the same

AdTypo_5_Perception & Organisation
Carl Dair's Seven Typographical Contrast:
2. Weight: describes how bold type can stand out in the middle of the lighter type of the same style. Using rules, spots, and squares also provides a “heavy area” for a powerful point of visual attraction or emphasis.
3. Form: the distinction between a capital letter and its lowercase equivalent, or a Roman letter and its italic variant, condensed and expanded versions of the typeface are also included under the contrast of form.
4. Structure: the different letterforms of different kinds of typefaces. For example, a monoline sans serif and a traditional serif, or an italic and a blackletter.
5. Texture: by putting together the contrasts of size, weight, form, and structure, and applying them to a block of text on a page. Texture refers to the way the lines of type look as a whole up close and from a distance.
6. Direction: the opposition between vertical and horizontal, and the angles in between.
7. Colour: The use of colour is suggested that a second colour is often less emphatic in values than plain black on white.
.jpg)
Form

Fig.1.32 Form
Organisation
Gestalt is a German word meaning the way a thing has been “placed” or “put together”. Gestalt theory emphasizes that the whole of anything is greater than its parts.
Gestalt Laws (Principles) by Max Wertheimer:
1. Law of Similarity: Elements that are similar to each other tend to be perceived as a unified group (eg. grouping of colour, orientation, size, or indeed motion).
2. Law of Proximity: Elements that are close together tend to be perceived as a unified group.
3. Law of Closure: The mind’s tendency to see complete figures or forms even if a picture is incomplete, partially hidden by other objects, or if part of the information needed to make a complete picture in our minds is missing.
4. Law of Continuation: holds that humans tend to perceive each of two or more objects as a different, singular, and uninterrupted object even when they intersect.
5. Law of Symmetry
6. Law of Simplicity (Praganz), etc.

INSTRUCTIONS
In this exercise, we are going to design layouts according to the 8 types of typographic systems that we learned in lecture 1, which are axial, radial, dilatational, random, grid, modular, transitional and bilateral. The content is given and we are expected to explore various ways to arrange the information.
Task requirements:
- Adobe InDesign
- 200 mm x 200 mm
- Black
+ one other colour
- Limited graphical elements are allowed (dots,
line, etc...)
In the first class, we are given some time to test our understanding on the typographic system. We have to create 1 layout as what we are going to do in Exercise 1 using the axial system.
.jpg)
1. Research
Headings / Titles
As there are 3 headlines and we can choose any one of them in our layouts, Mr Vinod advised us that we can read through the articles of those headlines so that our layout designs will not be off topic.
A) All Ripped Up: Punk influence on Design
Punk emerged
as a rebellious and DIY (do-it-yourself) movement in the 1970s,
characterized by its anti-establishment attitude, energetic music, and
distinctive aesthetic.
B) The ABCs of Bauhaus Design Theory
Bauhaus aimed to unite
art, craft, and technology, emphasizing functional design and the
integration of fine arts and everyday objects.
C) Russian Constructivism and Graphic Design
Russian
Constructivism was considered more of a philosophy than just an art style.
It reflected a belief in art for social change rather than personal
expression.
Typographic Systems
I tried to research on the systems that I'm still not 100% clear like modular system, transitional system and bilateral system. I searched some visual reference before starting on my own layout.


Bilateral system is similar with when the text is reflected or mirrored across an axis. Modular layouts use repeating structures to break up the content. These structures can be basically anything: shapes are the most common. The transitional typographic system is defined by the layering of lines of text into informal textured planes and shifting tonal bands.
2. Layout Explorations
In this step, I started with listing out the information I need to include in the layouts. I drafted out all of the information according to each typographic systems. I used sans serif typefaces in the layouts as I planned to use the first title, "Russian Constructivism and Graphic Design" and also the second title "All Ripped Up: Punk Influences in Design" for different typographic systems. As what we had learned, all font sizes are between 8 pt to 12 pt for the contents and for title, I used a much more bigger font size. I created the layouts based on my understanding on the typographic systems and I also tried out a few attempts on different placements of the information for some of them.
.png)
.png)
.png)
.png)
I tried using grids and baselines for some of the layouts like axial system, bilateral system, grid system and modular system. As I worked on the layouts, I tried to find more inspiration about the typographic systems.
Axial System


Fig.2.6 Axial System (30.8.2023 - Week 1)
I tried to maintain the simplicity in this system, I used a straight line as the axis using 3 columns in Adobe InDesign. The information is placed on left and right of the axis.
Grid System


I divided the artboard into 3 columns and 3 rows and included the colour, pink into the layout to highlight the important information or keywords.
Bilateral System

For bilateral system, the information need to be centralised. I decided to use different boldness for different information like title, dates and venues to differentiate the weight of the information.
Random System


I tried to randomly placed the information onto the layout using different fonts. I added some elements like lines and shapes of colour.


For radial system, I tried to use create a central point using the information such as the title and a circle shape. I used bold font for the titles and different font sizes for different information.
Dilatational System


For dilatational system, I started my ideas with the shape, circle. I placed the text on the circles with different font sizes and arrange them like the first layout. For the second layout of dilatational system, I used curved lines to to express this system. However, I'm not sure whether these layouts expressed this system correctly.
Modular System

For modular system, I used repeating quadrilaterals to break up the content. I feel like this is quite similar to the grid system. As what I read, usually people associate modular layouts with the grid and they worked well together.
Transitional System


For transitional system, I am not quite sure about the exact style of this system. I tried to express transitional style using lines on the first attempt; whereas for the second attempt, I tried to express transitional with the font, from extra bold to light.


After that, I explored more different ways of placing the information according to the systems including axial system, grid system, radial system, random system and transitional system. I made some small changes from the previous attempts for most of them.

3. Revised Layouts
After receiving some feedbacks in Week 2, I amended and made improvements on some layouts.
Grid System

For grid system, I redesign the layouts. I divided the layout into 3 columns and 3 rows. The title uses two units to let the title stands out. The first layout has more white space compared to the second one.
Radial System

For radial system, I amended it from week 1's attempt. Different from [Fig.2.15], the phrase 'open public lecture' is not aligned following the radial system. I added a circular shape to this but I reduced the transparency as I did not want the graphical element to stand out too much.
Modular System

For modular system, I remained the style from week 1's attempt, but I rearranged the text so that the text is within the units in modular system. I divided the layout into 3x3 units and arrange the text within each box.
Final Typographic Systems


Fig.2.20 Final Radial System - JPEG (6.9.2023 - Week 2)

Fig.2.21 Final Dilatational System - JPEG (6.9.2023 - Week 2)

Fig.2.22 Final Random System - JPEG (6.9.2023 - Week 2)

Fig.2.23 Final Grid System - JPEG (6.9.2023 - Week 2)


Fig.2.26 Final Transitional System - JPEG (6.9.2023 - Week 2)
Fig.2.28 Final Typographic System - PDF (with grids and guides)
(6.9.2023 - Week 2)
TASK 1: Exercise 2
Part A - Type and Play
1. Finding an Image
In Mr Vinod's briefing, he urged us to read more about this exercise through his article so that we can understand this task better. In week 2's class, we were asked to choose some images that we would like to use in this exercise and show to Mr Vinod so that he could advise us and approve our image.


Fig.2.30 Ex 2 Image 2 (6.9.2023 - Week 2)
Initially, I found this image [Fig.2.29] in my photo gallery and it is one of my option to use this image in this exercise. After I showed it to Mr Vinod, I was advised that if I wanted to use this photo, it will be challenging as there are different parts in this sculpture, when I dissected the letterforms, they might not look like they are from one 'source'. So, I found another image [Fig.2.30] of stones for this exercise.
2. Deconstructing the Image and Identifying Letterforms
At this stage, we need to observe and outline the shapes/letterforms in the image. From my observation, the stones are mostly polygons and have sharp edges. I identified the letterforms from the gap of the stones and the shapes of the stones.

3. Extracting Letterforms
I used pen tool in Adobe Illustrator to extract the letterforms as we are going to refine the letterforms using Illustrator in the following steps. As most of the stones have sharp edges, I tried to maintain this characteristic while drawing out the outlines of letterforms in the image. The letterforms I extracted are uppercase O, S, E, N and T.
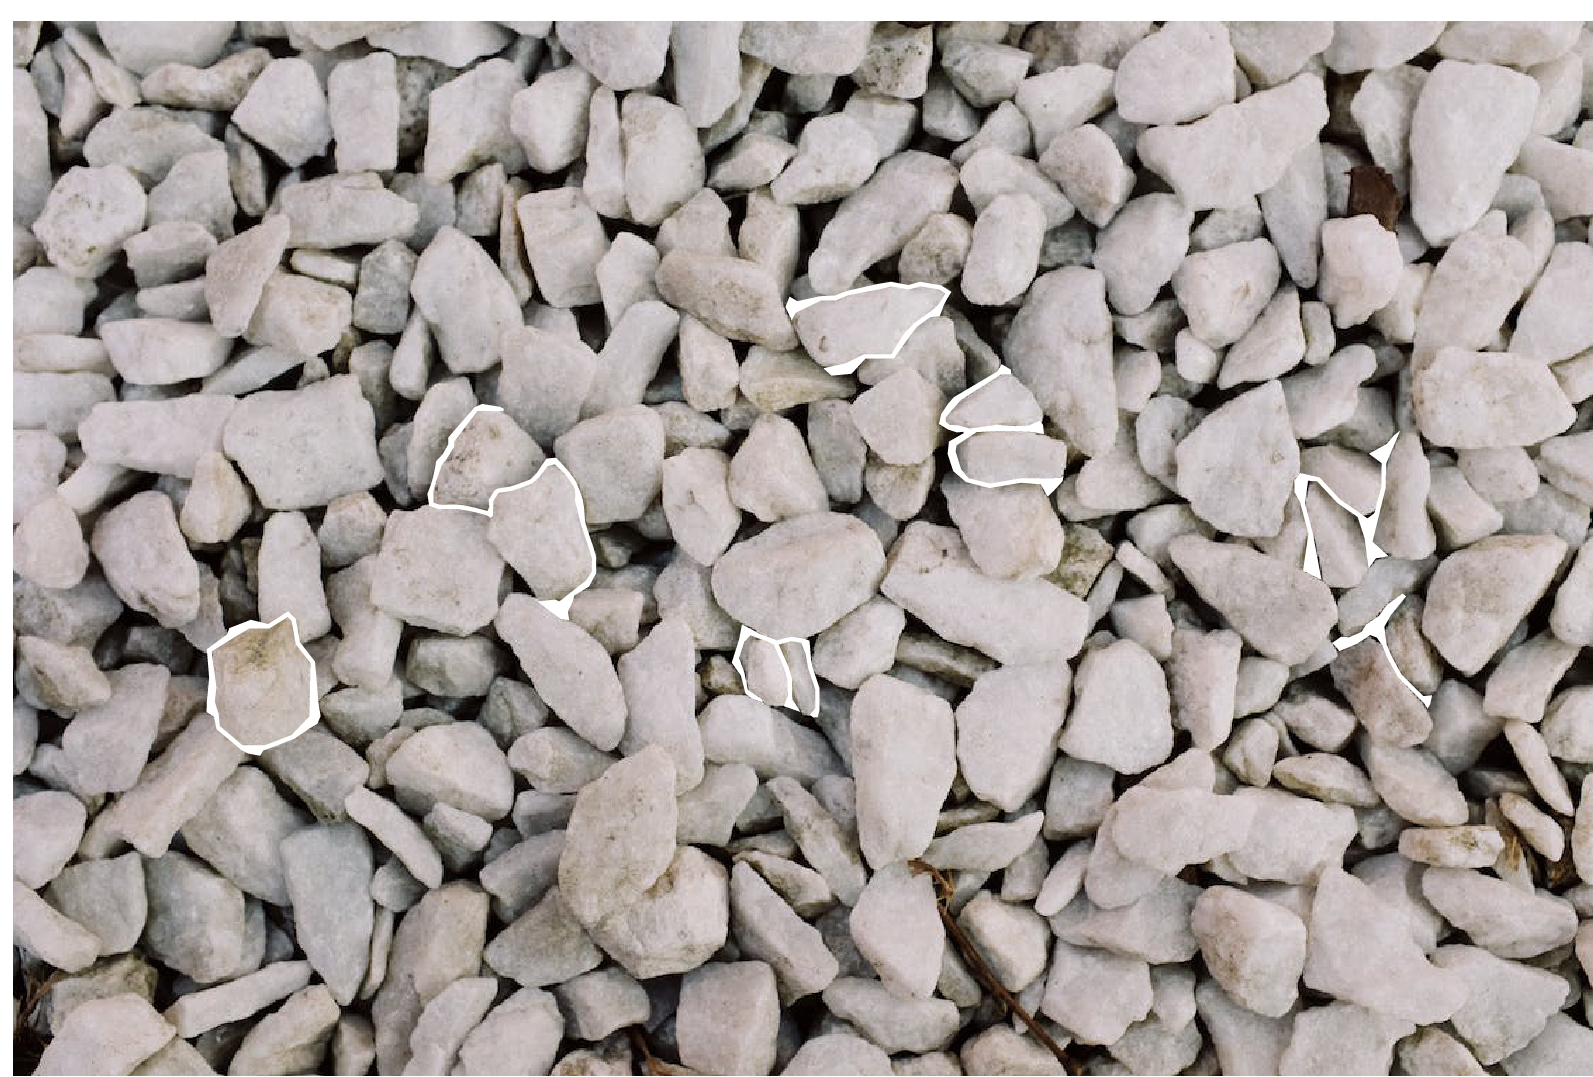

Fig.2.33 Extracted Letterforms (6.9.2023 - Week 2)
4. Identifying a Reference TypefaceThere are 2 typefaces I had identified, which are Wide Latin and Latinia, but I'm going to choose one of them as my reference typeface. The reference typeface is used to guide us while refining the extracted letterforms. As the letterforms of Wide Latin is very wide, I think it has a big contrast with the letterforms that I have extracted although the shape of Wide Latin can be used as guidance. Therefore, I chose Latinia as my reference typeface.
.png)
First of all, I placed the reference typeface at the back with lower transparency and the extracted letterforms at the front so I can see the comparison between the two.

1st Refinement
In the first refinement, I edited the anchor points and tried to refine the shape within the reference typeface. I also refine the thickness of the extracted letterforms, especially the letter 'S' and 'O' as their strokes are very thin while also maintaining the edges.

2nd Refinement
In the second refinement, I tried to standardise the thickness of the strokes and adjust the shape of the letterforms in terms of x-height following the reference typeface. For the letter 'N', it requires more adjustment in this stage as in [Fig.2.35], it looks very much distorted as the left vertical stroke is shorter than the right vertical stroke.

3rd Refinement
In the third refinement, I tried to refine the letterforms more towards and alike to the reference letterforms. For the letter 'T', I straightened the vertical stroke more compared to the originally extracted version. For the letter 'E', I tried to shorten the horizontal stroke as they are much more longer while comparing the extracted letterform with the reference typeface.

4th Refinement
After comparing the letterforms of 3rd refinement and the original extracted version, I feel like I have gone a little too much to the reference typeface. So in the 4th refinement, I readjusted some parts according to the extracted letterforms.

5th Refinement
Similar with what I did in 4th refinement, I keep refining the letterforms until I found a balanced point between the extracted letterforms and the reference typeface. I tried to make some parts of the strokes thinner like the extracted letterforms.


Fig.2.42 Refinement Process (6.9.2023 - Week 2)
6th Refinement
After receiving feedbacks from Mr Vinod, I decided to add the shapes of the stones into my letterforms. I review back my image, and I drew out the shape of a few stones that can be 'inserted' into the letterforms. I extracted the shape of the stones and put into the letterforms like how [Fig.2.43] shows, I overlapped the shape of the stones to the letterforms.
.png)
After that, I remove the previous version of letterforms, left with letterforms that are arranged with the stones' shape. I refined the shapes so that they become more consistent in terms of width and stroke.
.png)

Fig.2.45 6th Refinement (13.9.2023 - Week 3)
After finalising the letterforms, we are required to make a movie poster using the object we chose and the final letterforms. We are allowed to find a new image but need to be the same object. The size of the poshould be 1024 px X 1024 px. I used the same image, I edited the image into grayscale in Adobe Photoshop, then I moved to Adobe Illustrator to continue my work. I decrease the brightness and make the image monochrome. Then, I placed my letterforms into the image. Initially, I placed them at the centre, but after adingg the logos of movie companies etc on the lower part, I decided to place the letterforms at the upper part so that they look more balanced.

Fig.2.46 Poster (13.9.2023 - Week 3)
Final Type and Play (Part A)

Fig.2.47 Image (13.9.2023 - Week 3)

Fig.2.48 Extracted Letterforms on Baseline (13.9.2023 - Week 3)


Fig.2.50 Final Letterforms on Baseline (13.9.2023 - Week 3)


Fig.2.52 Extracted Letterforms vs Final Letterforms (13.9.2023 - Week
3)

Part B - HONOR Competition
For exercise 2 part B, we need to participate in this HONOR competition. There are a few categories in the competition, we can choose either one. I chose the category of wallpapers, there are two types, which are foldable wallpaper and normal wallpaper. We need to create an overall visual design with the size of 6000 px X 3000 px and an animation. I chose the topic of 'Renewal of Life - Return', which contemplates humans' relationship with all things.
I thought of using sea as my design theme. I think of a slogan that corresponded to my artwork, which showing big waves. To make the animation, I used various method but it is quite difficult to do it in Adobe After Effects because I did it in Adobe Illustrator, and the file is very large. So, I used Procreate to animate the image.
.png)
Final HONOR Competition


"Ride The Wave of Change"
The illustration titled "Urging Humanity to Save Our Oceans" depicts a powerful and emotive scene that aims to raise awareness about the critical need to protect our planet's oceans. The big waves of the ocean represents the danger of the ocean caused by various reasons, the whale represents the marine life under the sea. The message is of this illustration is that we have a responsibility to protect and preserve our oceans for future generations. The illustration urges viewers to take action, to reduce plastic consumption, support conservation efforts, and make sustainable choices that will ensure the health and vitality of our oceans.
FEEDBACKS
Week 1 / Exercise 1
General Feedback:
Do some research before designing the layout. The font size should be between 8 to 12 points like what we learned in Typography as that is the normal and suitable size for printed paper within A4, for title, can increase the point size until it's suitable.
Week 2 / Exercise 1
General Feedback:
Exercise 1:
Overlapping can cause difficult in reading. Be careful of using graphical elements so that they won't overwhelm the main content, it's either enhancing or overwhelming the contents. The content should not exceed the gutter. Having a gap between the baseline and words increase readability.
Exercise 2:
Choose an image that does not contain too many elements. Read the blog about this exercise to gain a deeper understanding about this exercise.
Specific Feedback:
Downsize font size of numbers so that it won't stand out. White space is ok if we know how to balance it. Make sure the text is within the units in modular system.
Week 3 / Exercise 2-A
General Feedback:
Exercise 2-A:
Maintain consistency of width, height and stroke of the letterforms. Does the letterforms extracted have the nature of the object in the image? The objective of this task is the letterforms should have the characteristics of the objects. Learn to evaluate ourselves!
Specific Feedback:
The final letterforms do not really represent the objects. Mr Vinod suggested me to use the form/shape/outline of a few stones to build one letterforms. Some letterforms are too sharp, the stones are not as sharp as the letterforms.
Week 4 / Exercise 2-A
Specific Feedback:
The final poster is OK.
REFLECTION
Experiences
Throughout these few weeks, we had completed 3 exercises in total. The first exercise is designing layout according to the 8 typographic systems. In this exercise, I tried to have 2 ideas for each layout initially. I could do so for some of the systems, but I was stuck in the middle and could not come out with ideas for typographic systems like dilatational system, modular system and transitional system. So, I go back to look at the rules of each typographic systems again so I can truly understand each systems clearly. After listening to the feedbacks given to other peers, I tried to look back and review on my work and amend some of them. In the following exercise, which is type and play, I read through Mr Vinod's record about this exercise and observe the work step by step. I found a photo of stone and decided to find the letterforms through the gap, however, Mr Vinod said that I should have found the letterforms from the shape of the stones. I had to either redo it or amend and improve the letterforms by attaching the characteristics of stones into the letterforms. I amended the letterforms and finally make a poster using the letterforms. The third exercise (Exercise 2 Part B) is a competition, it is compulsory for us to participate, I decided to use the topic of sea with the message of saving the ocean in this competition.
Observations
From the first exercise, I observed that creating a clear hierarchy within typography is essential for effective communication. Through this exercise, I realized how different typographic systems can establish hierarchy based on the placement and sizes of the text. I also noticed that in most of the system, we should follow the grids and guides while placing the text to achieve effective visual communication. In the second exercise, I observed that observation is very important in this exercise so that we are able to found the letterforms in the objects. Besides, while creating the final letterforms in this exercise, we should not go too far from the extracted forms to the reference typefaces, as this will cause the letterforms to loss the characteristics of the initial object.
Findings
FURTHER READINGS
.png)
Fig.5.1 Typography, Referenced (2012)
Chapter 4: Type Designers
In this chapter, the book lists out a numbers of influential type designers from pre-twentieth century, twentieth century to the present and the 21st century.
Pre-twentieth Century
John Baskerville, Giambattista Bodoni, William Caslon, Firmin Didot, Pierre Simon Fournier, Claude Garamond, Philippe Grandjean, Robert Granjon, Francesco Griff o, Jean Jannon, Nicolas Jenson, Aldus Manutius
-
John Baskerville
British, 1706–1775
Typeface: Baskerville (1757)
The typeface Baskerville remains one of the most distinctive and legible Transitional typefaces ever designed, most British printers continued to use Old Style or Garalde typefaces such as Garamond throughout the eighteenth and nineteenth centuries.
-
William Caslon
British, 1692–1766
Typeface: Caslon (1725)
William Caslon was well known in eighteenth-century Great Britian for designing typefaces that had crisp, upright characters. William Caslon was undeniably the most important member of the Caslon family due to his contributions to typeface design.
Otl Aicher, Jonathan Barnbrook, Ed Benguiat, Morris Fuller Benton, David Berlow, Lucian Bernhard, Charles Bigelow, Peter Bilak, Neville Brody, Margaret Calvert, Matthew Carter, Oswald Bruce Cooper, Willem Hendrik Crouwel, William Addison Dwiggins, Tobias Frere-Jones, Adrian Frutiger, Eric Gill, Frederic Goudy, Luc(as) de Groot, Jonathan Hoefl er
-
Otl Aicher
German, 1922–1991
Typefaces: Traffi c (1974), Rotis (1988)
Aicher designed the typeface Traffic, which was used in the public transport systems in Munich and at the Munich Airport. But his best-known typeface, Rotis, combined elements of serif, semi-serif, sans serif, and semi-sans serif.
-
Martin Majoor
Dutch, 1960–
Typefaces: Scala (1990), Scala Sans (1993), Seria (2000), Nexus (2004)
In 1986, he started working as a typographic designer in the research and development department at Océ-Netherlands, where he did research on screen fonts and worked on the production of digital typefaces for laser printers.
Twenty First Century—A New Breed
Rui Abreu, Veronika Burian, Pilar Cano, Eric Chan, Joshua
Darden, Tomi Haaparanta, Stefan Hattenbach, Jessica Hische, Chester
Jenkins, German Olaya, Eric Olson, Alejandro Paul, José Scaglione, Kris
Sowersby, Fabian Widmer, Stefan Willerstorfer, Luke Williams
-
Rui Abreu
Portuguese, 1979–
Typefaces: Cifra (2006), Catacumba, Gesta (2009), Foral, Orbe, Tirana (2010)
Rui Abreu has worked as an interactive media designer in several design firms and advertising agencies, along with his independent type design work. In 2008, he launched R:Typography, a showcase to promote his own work.


Comments
Post a Comment